PVC Vacuum Chamber for Film Storage
By Steve Walters, 2003
I shoot hypered Tech Pan and have learned (the hard way) that this film is very
sensitive to moisture. Here on the East Coast of the U.S., high levels of humidity
persist throughout much of the year. If Tech Pan film is used in such a humid
environment, it becomes fogged just as though it had been exposed to light. This
can occur either before or after using the film at the telescope. So, to prevent
fogging, I store the film in a vacuum tank when it's not in the camera body. During
exposures, I use a nitrogen purge to keep humidity away from the film.
Building a PVC Vacuum Chamber
For a long time, I used a small metal tank for film storage but it could only
hold two rolls of medium format film.. I tried various different schemes to
build a PVC chamber but was never able to get one to hold a vacuum for a really
long time (several months). But then I discovered the "pipe union"
PVC joint at Home Depot. This gizmo is the perfect element around which to construct
a vacuum chamber. It has a ring that presses a fitting against a rubber o-ring
sitting in a groove and costs only $7. Here is the completed chamber.
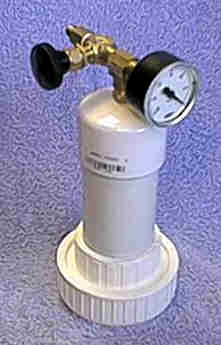 To
build the chamber, you'll need a pipe union, a length of PVC pipe, and a cap.
I made mine using 2" pipe and fittings which allows two rolls of film to
sit side-by-side in the chamber. It's long enough (6") to allow four rolls
of 120 film to fit inside.
To
build the chamber, you'll need a pipe union, a length of PVC pipe, and a cap.
I made mine using 2" pipe and fittings which allows two rolls of film to
sit side-by-side in the chamber. It's long enough (6") to allow four rolls
of 120 film to fit inside.
You'll also need a threaded pipe fitting that has a 1/8" male flare at
one end and a1/4" male NPT at the other. Drill a hole in the PVC cap that
is just a bit smaller than the 1/8" flare fitting and thread it in. The
brass fitting will cut its own threads into the PVC. Then remove the fitting,
smear a bit of epoxy on the threads of both the cap and the flare fitting and
screw it back in. The epoxy will ensure a strong air-tight connection. Now glue
the pipe cap and the union on to the two ends of the PVC pipe using normal PVC
cement.
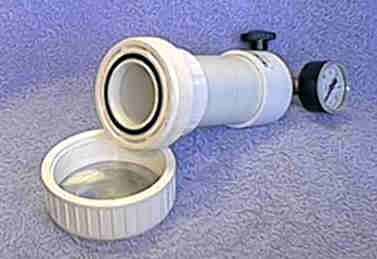
One part is needed which you'll have to make yourself, a flat aluminum plate,
1/8" thick, to fit inside the union's ring. Simply remove the ring from
the union and cut the aluminum plate so it fits inside the ring. When the ring
is screwed on, this plate will be pressed against the o-ring and seal the tank.
Be careful not to scratch the plate when cutting it because you must polish
it to a scratch free finish. Otherwise, air will leak into the tank at the scratches.
Do your best to put a mirror polish on the plate, this will allow it to hold
a vacuum for several months. In my case, I polished the plate using grit and
cerium oxide that I have for grinding mirrors. You can see it sitting inside
the ring in this photo.
 Lastly, add
a 1/4" NPT "Tee" fitting, a vacuum gauge and a valve with a 1/4"
NPT flare at one end for ataching a vacuum pump to the 1/4" male NPT fitting
extending from the pipe cap. I found the vacuum gauge and valve on the Internet
for $5 each. The other brass pipe fittings cost about $5 total at Home Depot.
Add some vacuum grease to the o-ring and its slot in the union.
Lastly, add
a 1/4" NPT "Tee" fitting, a vacuum gauge and a valve with a 1/4"
NPT flare at one end for ataching a vacuum pump to the 1/4" male NPT fitting
extending from the pipe cap. I found the vacuum gauge and valve on the Internet
for $5 each. The other brass pipe fittings cost about $5 total at Home Depot.
Add some vacuum grease to the o-ring and its slot in the union.
Once the tank is tested and you're sure it has a good seal, glue the aluminum
plate inside the ring with some silicon glue so it won't fall out when using
it in the field. Getting dirt or a scratch on the plate will make it leak. Use
a glue that will later allow you to remove the plate if it needs re-polishing.
I'm sure someone will want to use this tank for hypering. Since hypering involves
elevated temperatures of up to 50 degrees C (120 degrees F), I am not sure if
PVC will survive for long. Also, while it works well for holding a vacuum, it
may not be possible to pressurize the interior to the +5 PSI commonly used for
hypering. If you try this and it works, let me know.
Clear Skies!
Steve...